4. Appliances, OVA, snapshots and Guest Additions
Installing an operating system from zero takes a long time and every installation is a little different. A virtual appliance lets you start in minutes from a machine that someone has already prepared. Snapshots let you experiment without fear. Guest Additions make the VM comfortable to use. These three tools are what you will use every week in this module.
1. Virtual appliances
Sección titulada «1. Virtual appliances»A virtual appliance is a virtual machine that is already installed, configured and ready to start. Think of it as a “golden image”: the author chose the operating system, the users, the updates and the programs, and tested that everything works. You only have to import it.
Why is it useful?
- Consistency. Everyone starts from the same machine. If something fails, the difference is not in the installation.
- Speed. You skip the long installation.
- Portability. An appliance made on one computer imports on another one, whatever the host operating system.
- Rollback. After importing you can take a snapshot of the clean state.
OVF and OVA
Sección titulada «OVF and OVA»Appliances are distributed in an open standard format, so that different hypervisors can read them.
| Format | What it is |
|---|---|
| OVF (Open Virtualization Format) | A folder with several files: a .ovf file (an XML description of the hardware: CPUs, memory, controllers, network), one or more disk images (usually .vmdk) and, often, a manifest .mf with checksums to verify the files. |
| OVA (Open Virtual Appliance) | A single file: an archive (TAR format) that contains all the files of an OVF. It is easier to download and copy. |
Use the OVA when you want one piece, and the OVF when you want to look inside or replace one of the files. On Linux you can see what an OVA contains without importing it:
tar -tvf appliance.ovaVerify before you import
Sección titulada «Verify before you import»Download sites often publish a checksum: a short code that identifies the exact content of a file. If you calculate it and it is equal to the published one, the file is complete and was not changed. If it is different, delete the file and download it again.
sha256sum appliance.ova # Linuxshasum -a 256 appliance.ova # macOSGet-FileHash .\appliance.ova -Algorithm SHA256 # Windows PowerShellImporting an OVA (graphical way)
Sección titulada «Importing an OVA (graphical way)»- Save the OVA in a folder with enough free space. The virtual disk can use about 1.3 to 1.5 times the size of the OVA.
- Verify the checksum if there is one.
- Open VirtualBox and choose File → Import Appliance….
- Select the OVA file and press Next.
- Review the appliance settings. Change the VM name (for example,
SOM-U2-Surname) and adjust the CPUs and RAM to what your computer can give. Leave the first network adapter in NAT. - In the MAC address policy option (older versions have a checkbox called Reinitialize the MAC address of all network cards) choose to generate new MAC addresses. This avoids conflicts when many students import the same file.
- Press Import and wait. The new VM appears in the list.
- Start the VM. The user and password of an appliance are given by the author (in this unit, by your teacher in Aules).
Checks after the first start
Sección titulada «Checks after the first start»Open a terminal inside the guest and run:
hostnamectl # name of the machine, operating system and kernelip a # network interfaces and addressesdf -h # disks and free spaceIf you see an address like 10.0.2.15 in NAT mode, your VM has a connection.
Command line (useful to automate)
Sección titulada «Command line (useful to automate)»VBoxManage import appliance.ova --vsys 0 --vmname "SOM-U2-Surname"VBoxManage modifyvm "SOM-U2-Surname" --memory 2048 --cpus 2And the other way: you can export your own VM to an OVA to share it or to keep a copy (File → Export Appliance…, or VBoxManage export).
And for Windows?
Sección titulada «And for Windows?»The process is the same for Windows appliances, but they are less common because the Windows licence rules limit their distribution. Microsoft publishes official evaluation versions of Windows that are time limited. You will work with one in Activity 6.
2. Snapshots
Sección titulada «2. Snapshots»A snapshot saves the state of a VM at a moment in time so that you can return to it later. It is like a “save game” point.
Each snapshot keeps:
- The configuration of the VM (virtual hardware).
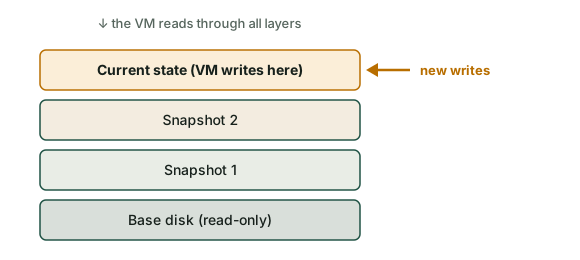
- The state of the disk. VirtualBox does not copy the whole disk. It freezes the current disk file as read-only and creates a new, small file called a differencing image. From then on, all changes go to the new file.
- The memory state, if the VM was running when you took the snapshot. When you restore it, the guest returns with the same windows and processes open.
You can imagine the disk as a pile of transparent sheets. Each snapshot is a new sheet on top of the previous ones. What you see is the combination of all the sheets, and the new sheet always receives the changes.
The operations
Sección titulada «The operations»| Operation | What happens | In the GUI |
|---|---|---|
| Take | A new layer is created. The VM goes on writing in the new layer. | Snapshots view → Take |
| Restore | The changes made after the snapshot are discarded and the VM returns to that point. | Select it → Restore |
| Delete | The snapshot is removed and its layer is merged with the neighbouring layer, so no data is lost. The VM does not change. | Select it → Delete |
Two important details:
- Delete does not delete your work. It deletes the checkpoint. VirtualBox joins the layers (it consolidates them), and this can take time and need temporary free space.
- Restore does delete your work done after the snapshot. VirtualBox can offer to make a snapshot of the current state first. Accept if you are not sure.
The snapshots form a tree: you can restore an old snapshot and then take a different snapshot from there, which creates a new branch.
From the terminal:
VBoxManage snapshot "SOM-U2-Surname" take "baseline" --description "Clean state after import"VBoxManage snapshot "SOM-U2-Surname" listVBoxManage snapshot "SOM-U2-Surname" restore "baseline"VBoxManage snapshot "SOM-U2-Surname" delete "baseline"Good practices
Sección titulada «Good practices»- Take one right after the import or the installation (name it
baseline) and one before every risky change: an upgrade, a driver, a big configuration change. - Use meaningful names that explain why and when:
before-lamp-install_2026-10-05. - Keep few snapshots. Long chains use more disk and make the VM a little slower, because a read may need to look through several layers.
- Take them with the VM powered off if you do not need the open programs. They are smaller and faster.
- Delete the ones you do not need when the experiment ends.
- A snapshot is not a backup. It lives on the same disk. To keep a copy, export the VM to an OVA or clone it (Machine → Clone, a full clone also creates a VM with a single disk and no snapshot tree).
3. Guest Additions
Sección titulada «3. Guest Additions»A fresh guest only knows generic virtual hardware, so the VM feels clumsy: the mouse gets “trapped” in the window, the screen has fixed sizes and copy-and-paste between host and guest does not work. Guest Additions are drivers and small tools that you install inside the guest to fix this. They come in a CD image called VBoxGuestAdditions.iso that VirtualBox provides.
With them you get:
| Feature | What it does |
|---|---|
| Mouse integration | The pointer moves freely between the VM and the host. |
| Dynamic resolution | The screen adapts when you resize the window. Better graphics drivers. |
| Shared clipboard | Copy and paste text between host and guest. |
| Drag and drop | Move files by dragging them (not always reliable). |
| Shared folders | A folder of the host that the guest can open. |
| Time synchronisation | The guest clock follows the host clock. |
| Seamless mode | Windows of the guest appear on the host desktop. |
Installing them in a Linux guest
Sección titulada «Installing them in a Linux guest»-
Start the VM and log in.
-
Prepare the tools needed to compile the drivers. In Ubuntu or Debian:
Ventana de terminal sudo apt updatesudo apt install build-essential dkms linux-headers-$(uname -r) -
In the VM menu choose Devices → Insert Guest Additions CD image….
-
Open the virtual CD (the file manager shows it) and run the installer. From a terminal it looks like this (the folder name can change):
Ventana de terminal sudo sh /media/$USER/VBox_GAs_*/VBoxLinuxAdditions.run -
Restart the VM.
Installing them in a Windows guest
Sección titulada «Installing them in a Windows guest»- Start the VM and log in.
- Choose Devices → Insert Guest Additions CD image….
- Open the CD in File Explorer and run
VBoxWindowsAdditions.exe. Accept the driver installation. - Finish the wizard and restart.
Shared clipboard and shared folders
Sección titulada «Shared clipboard and shared folders»For the clipboard: with the VM running, choose Devices → Shared Clipboard → Bidirectional. (It can also be set in Settings → General → Advanced.)
For a shared folder:
-
Shut the VM down or use Devices → Shared Folders → Shared Folders Settings….
-
Add a folder of the host, give it a name and tick Auto-mount and Make Permanent.
-
In a Windows guest the folder appears as a network drive (for example
Z:). In a Linux guest it appears under/media/sf_<name>. -
In Linux, if you get a permission denied message, add your user to the
vboxsfgroup and log in again:Ventana de terminal sudo usermod -aG vboxsf $USER
Check what you have learned
Sección titulada «Check what you have learned»-
What is the difference between an OVF and an OVA?
Answer
An OVF is a folder with several files (an XML description, disk images and a manifest). An OVA is a single TAR file that contains all those files.
-
Why do you calculate a checksum before importing a downloaded appliance?
Answer
To verify that the file is complete and has not been changed. If your checksum is different from the one published by the author, you must not use the file.
-
You take a snapshot, install a program, and then restore the snapshot. What happens to the program? And if you delete the snapshot instead of restoring it?
Answer
When you restore, the program disappears: the VM returns to the state of the snapshot. When you delete the snapshot, the program stays: you only remove the checkpoint and its changes are merged.
-
Name three problems that Guest Additions solve.
Answer
For example: the mouse captured by the window, the fixed screen resolution and the lack of copy and paste between host and guest. They also add shared folders and time synchronisation.
-
Why is it a bad idea to use only snapshots as your backup system?
Answer
They are stored on the same disk as the VM, so a disk failure would destroy both. A long chain also makes the VM slower and uses more space. Use exports or copies as backups.
Glossary
Sección titulada «Glossary»| English | Castellano |
|---|---|
| virtual appliance | aplicación virtual |
| golden image | imagen de referencia |
| OVF / OVA | OVF / OVA (formatos de aplicación virtual) |
| checksum | suma de verificación |
| import / export | importar / exportar |
| manifest | manifiesto |
| differencing image | imagen diferencial |
| take / restore / delete a snapshot | tomar / restaurar / eliminar una instantánea |
| Guest Additions | Guest Additions (complementos del invitado) |
| shared folder | carpeta compartida |
| shared clipboard | portapapeles compartido |
| clone | clonar |
Esta web no usa cookies ni recoge datos personales. Tu navegador solo guarda, en tu propio equipo, algunas preferencias: el tema claro u oscuro, el estado del menú y, en los laboratorios, la última pestaña abierta y el tamaño de letra.